Table of Contents
In my previous post, I described the software and settings I consider essential for a computer – now I’ll do the same for a mobile phone.
This post will be a little shorter, for three reasons:
- firstly, as an Android user, I can only comment on Android (sorry, Apple users; but you should at least read the table of contents, even if the specific description or implementation will not be for iOS)
- on the other hand, even within Android phones, depending on the manufacturer, many settings/applications may differ or be missing
- and of course even with Android apps, it is often down to individual preference as to which apps you use when
So I tried to limit myself to things that are available and useful for the general public in most cases, without listing all the apps I use.
Starting point
As with all such articles, I will assume the following about the reader:
- can manage and use their Android smartphone at least at a basic level
- knows at least some English, and is not afraid of English terms; if necessary, is able to find and do things in English
And then, as in the previous article, let’s assume you’ve bought a new phone and have logged into your Google account on it, so you’ve already taken the first steps, or you might want to make the most of your existing phone.
Note: I hope no one is confused by the fact that I use some Hungarian (Android 10) and some English (Android 11) examples in this post.
Android basic settings
Let’s start with the most important thing, the security of your phone and the data on it.
Basic security settings and Lock screen
Whether it’s a brand new phone or an existing one, the minimum requirement today is to have at least one fingerprint, pin code, pattern or password protection locked on your phone.

If this is not already set up, I recommend that you do so in Settings > Security, because it not only prevents pickpocketing, but also prevents unauthorised people from accessing your data.
Under the Secure Lock setting, there are more items to check:
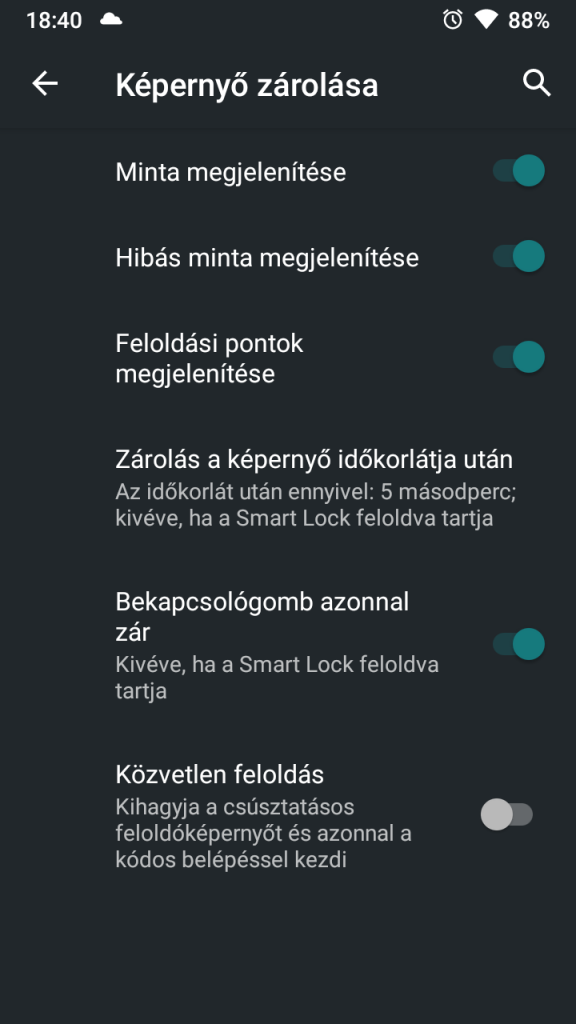
For example, I turn off Make pattern visible, enable the Lock instantly with Power key option, and set a maximum timeout of 5 minutes in Auto lock when screen turns off – which means that after 5 minutes of inactivity, my phone will automatically lock.
Under Android 11 there is also an Auto factory reset and a Lock network and security menu option:
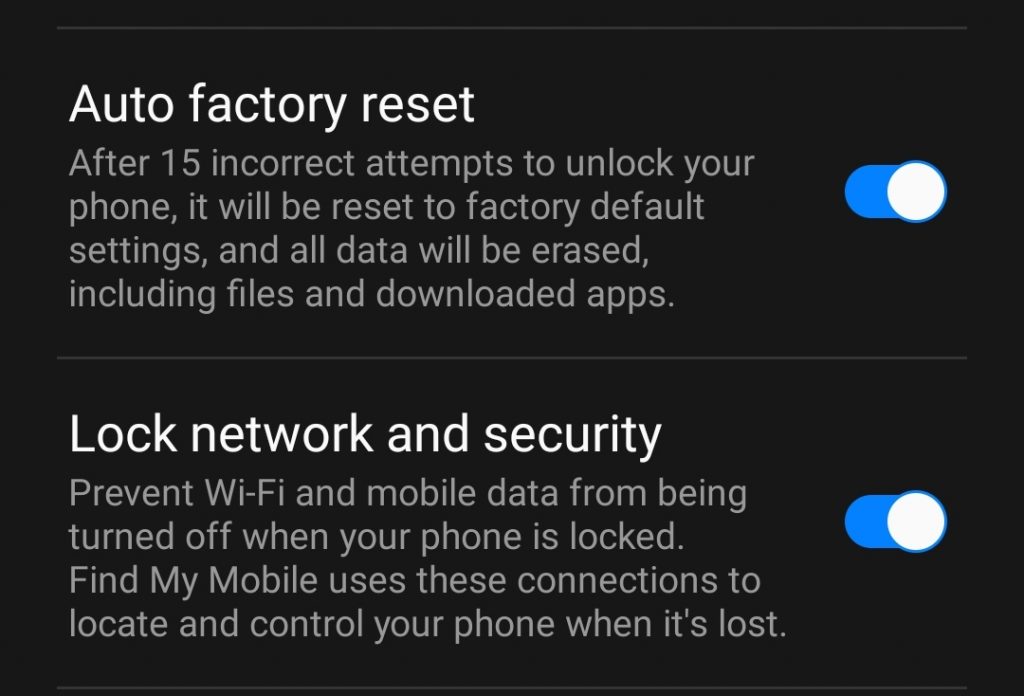
The former wipes everything from your phone after 15 incorrect login attempts and resets it to factory default; the latter prevents you from turning off WIFI or mobile internet without unlocking the phone by pulling down the notification bar above when the screen is locked.
Both are very useful if your phone is stolen and unauthorised people want to access it, or if you lose your phone and want to find it later.
By the way…
How do we find our phone remotely?
In the Hungarian Facebook group Pesten Hallottam, every day a post is posted that someone has found a lost phone and is looking for its owner.
I have a feeling that few people know this, but in such a case you can easily find the phone on your computer when you get home, for example, using Google’s Find My Device service. All you have to do is open this URL:
https://www.google.com/android/find
In the window that appears, after logging in with the Google account you use on your mobile phone, you will see the status of your phone on the left, with a map showing its last reported location, and the following options:
- ring it remotely for 5 minutes,
- lock the screen and also display a message to the finder, e.g. “whoever finds this, call 06-30-…”
- or, as a last resort, remotely delete the contents of your phone.

I’ve highlighted the middle one because it’s particularly useful if you lose your phone and want to let the finder know how to contact you.
Find My Device is a built-in feature on all Android phones, available to anyone. I believe Apple products have something similar.
Note: Samsung phones also have Samsung’s own proprietary -and, because of the above, I think completely redundant- Find My Device setup; this allows us to access similar services by opening their own URL and logging into our Samsung user account – as long as we have it set up on our device.
Eye saver mode
After safety, comes health and eye protection. As I mentioned in my previous post, there’s a method for computers, but you can also turn on the eye-saving night mode for mobile phones at night. From Android 7 onwards, this is also a built-in feature, usually found under Settings > Appearance > Night Light (or similar name). For me, it’s called Eye comfort shield in Samsung:
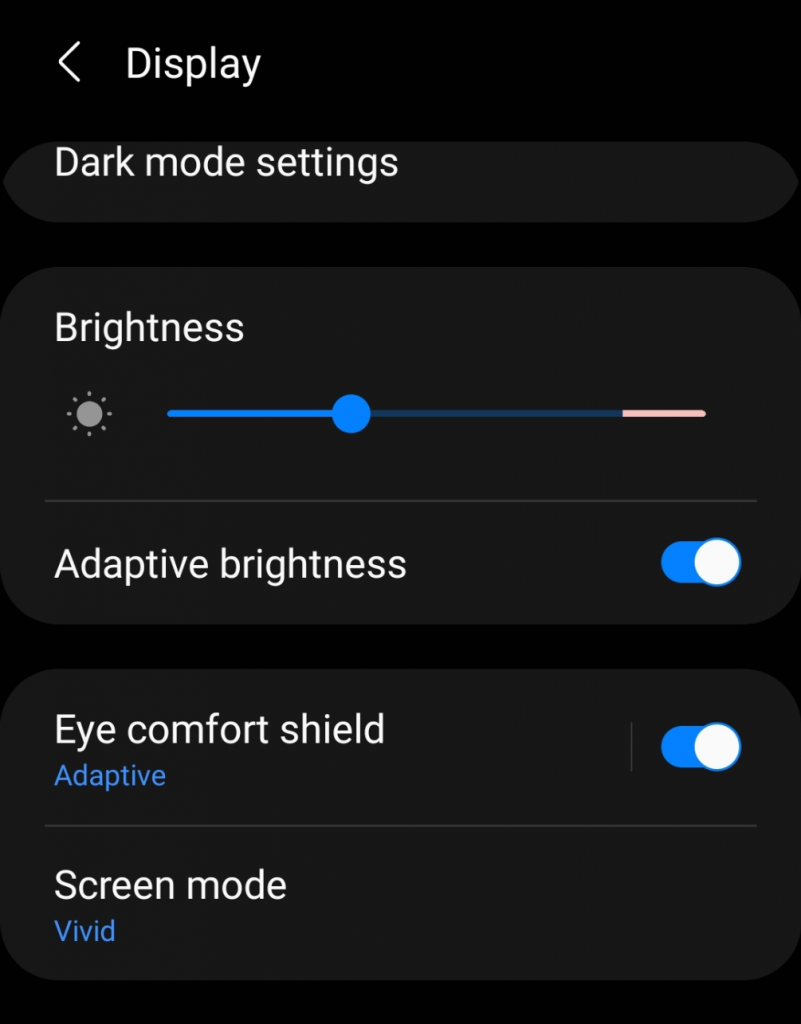
If you don’t have this setting, there are many apps for it in the Play Store, and I can recommend Twilight or Blue Light Filter.
Blocking ads
I personally have always hated commercials and ads, even on TV.
On mobile I especially hate it when an ad takes up a third of the already small screen, when all I want to see is the content of an article. But it is even more shocking when I click on something when a page is loading, and the content “jumps” because the ad is delayed, so I can open the ad in a new window. Unfortunately, this kind of sneaky solution is also used today, because both views and clicks make money for advertisers.
Fortunately, there are several ways to get rid of them.
How to install an app manually – or enable unknown sources
In the next section, I’ll cover apps that you won’t find in the Google Play Store, but will have to install manually. Installing Android apps is not a big devil’s errand, it works on a similar principle as for Windows, but we are not talking about .exe files, but .apk files.
Why is this necessary? What if there is no app in the Play Store?
There are many apps that are not official, but are rewritten, or ‘improved’ versions of existing apps, or that contain features that Google has no interest in listing on the Play Store, which is why they are not there. Most of these apps are, of course, in this field of advertising and privacy wars, but this will soon become clear once we get to the specific apps.
The point is that if you want to install applications manually, you will need to follow these steps:
For older Android phones: also in the Settings menu, usually under the Security tab (but if you have a search engine, it’s better to look for that too), you’ll find the global setting Allow unknown sources. Turn this on.
For newer Android phones, after downloading and opening the .apk installer of an app (not in the Play Store), we need to enable unknown sources for our mobile browser when installing it. An example of this will be shown below.
Is this dangerous?
Basically – yes. As Google will not be able to check the security of the app, there is always a risk of installing something harmful on your mobile, so think and research seriously before you do something like this.
I say this, of course, by recommending apps that should be installed in this way.
However, the two applications I recommend a little further down are open-source applications. This means that the code used to create the application is available to anyone online and runs on the phone. For the Android community, these two apps are well known and recommended on many forums, and I have been using them for literally years without any problems, so I can only recommend them for that reason. Make sure you only download them from their official website which I have linked to.
Choosing your browser


Some of you may not know, but the built-in browser on your phone (e.g. Samsung Internet) is not the only one you can use. Chrome, Firefox, but also many other browsers based on Chrome are available for Android in the Play Store – for example, the much talked about Kiwi browser.
Which one to choose?
Well, there are relatively minimal differences in performance between them – from the four examples above, I think you can’t go wrong with any of them. This is typically a case where it is down to everyone’s individual preference as to which one to use.
However, if you ask me, I would list a few considerations that you might want to take into account:
- Do you want to get your desktop search history or bookmarks on mobile? Depending on whether or not you want to take advantage of browser sync (i.e., whether or not you want to log into your browser profile as mentioned in my previous post), your desktop browser choice will greatly affect what browser you use on your phone.
- Don’t want to see ads when you browse? On Chrome, you can install extensions on your PC to block ads – but sadly not on your phone. However, with Firefox, Kiwi browser or Samsung Internet browser, you can!
- Should the search bar be at the bottom? Dark-mode? Do you like to personalise your browser? Firefox, Kiwi and Samsung Internet browsers have a lot of customisation options, but Chrome has fewer options and is more complicated to configure.
For me, blocking ads and syncing browsers has become a basic feature over the years, but I recommend whichever browser you choose to look at its settings to see if you can find some useful convenience features.
Browser extensions
As I mentioned above, Firefox, Kiwi browser and Samsung Internet browser can easily install and configure an ad-blocking add-on – in which case I would definitely recommend uBlock Origin. For Firefox, such a setup looks so simple:
Blokada
Of course, you can think a bit more globally.
If you want to block ads not only within the browser, but within all Android apps (e.g. even the nasty ad bars at the bottom of Android games), you can use Blokada, an open source ad-blocking app.
And here’s where what I mentioned above in the Enable Unknown Sources section comes in, as this is an app whose full version is not available in the Play Store, so you have to install it manually.
Fortunately the process is really not complicated, below I show you what the installation looks like for Firefox on an Android 11 phone after opening the official Blokada site:
It’s as simple as that, once installed, you can enjoy the joys of ad-free life by pressing the naaaay on button. As an example, here is index.hu opened in Chrome before and after:
Ads begone, like magic! 🙂
Inside the app, it’s worth checking out the Advanced section (third icon from the left), where under Blocklists you can set up additional lists to the default blocklist (although I don’t think this is necessary in most cases), and in the Apps section you can choose which apps you don’t want Blokada to intervene and block ads for.
This is also important to know, because sometimes some games or apps don’t work properly after turning on Blokada.
I’ve been a long time Blokada user and I’m pretty happy with it, but one thing even Blokada can’t prevent is ads in YouTube videos – but there’s a solution for that too…
YouTube Vanced
YouTube Vanced is a modified YouTube app for Android phones that also includes extra features, and therefore can only be installed manually.
Note: Interestingly, it’s called Vanced because it’s advanced, but without ads. This is on par with my wordplay abilities 🙂
What these extra features are, their website sums it up very well, but in a nutshell:
- block ads and embedded commercial videos
- full AmoLED display support (i.e. when selecting AmoLED black theme, the “dark pixels” are not actually illuminated, saving energy)
- playback of videos picture-in-picture (PIP) or in the background
- for full-screen display, volume and brightness control simply with one finger on the left and right
- and lots of extra settings to personalise how you want to use YouTube
The installation of YouTube Vanced is a bit more extreme, as Vanced consists of two things: one is the basic program itself, which looks exactly like the factory YouTube app. The other part is the so-called MicroG. The latter is needed so that we can log in with our Google account and still access any playlists, history or subscriptions under our user name.
By navigating to the official https://vancedapp.com, you can download and install a so-called Vanced Manager application, and within it you will have to install MicroG first, and then the actual YouTube Vanced. I have streamlined the process below:
Once you’re done with the installation, you can launch YouTube Vanced and start using your upgraded YouTube with all the extra features, of which for me especially, ad removal and background playback have been a lifesaver and a must for years.
If you want more information, you can read the description on the official website, or (ironically) you can also search YouTube and find longer instructions in English and German, as well as tutorial videos.
A few words about safe installation
There are other modified YouTube applications, such as NewPipe, which is also recommended in Android circles, but I can only describe Vanced here, as I have been using it for years.
In fact, I should mention quietly that ‘upgraded’ versions of other apps can be found on the web, such as Spotify or Instagram, or even premium versions of games that you can download and install without paying for them.
I don’t want to go into this topic in any depth, and I would advise the average user to stop installing at this point.
To be on the safe side, you might as well disable the Unknown Sources option (for new phones, go to Settings > Applications in the browser properties menu), as this will no longer be necessary.
Pit-stop
If you have reached this point and
- you’ve protected your phone from unauthorised users,
- you can find it remotely,
- our data and passwords are safely stored,
- and, if it’s important to us, we’ve blocked annoying ads,
I think this is an ideal starting point for most people. Well done, good job 🙂
Extras
Under the Extras section, I’ve just added more extra settings and applications that I use and recommend.
Developer settings and animation acceleration
There is a hidden section of Android phones called Developer options, and within this is a section where you can double the speed of your phone’s animations, speeding up your phone.
To get this section to pop up in the Settings menu requires a bit of effort at first, so I’d only recommend this for people who are more comfortable with the phone’s settings and not afraid of more extreme steps – the rest of you can skip it.
Enable developer settings
First, we need to find the Build Number in our settings.
If you have a search box under Preferences, it’s easier to search for “build” (there should be a match for both English and Hungarian):
In most mobiles this is usually under the Device Name option, in my case it’s under the Software Information option.
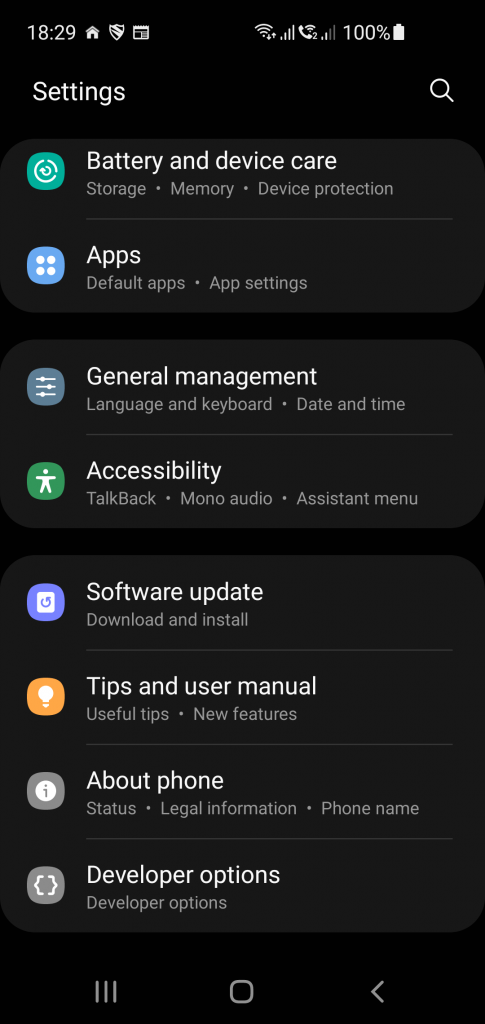
Once found, all you have to do is tap on this build number, many times – until the phone says that it has enabled the developer settings (a tooltip text will keep you informed how many taps away we are from this).
And if it’s enabled, scrolling down to the bottom of the Settings menu will bring up the new Developer options menu item:
Animation Acceleration
What we did above is to resize the “size” of the animations under the new menu item.
The speed of the various animations and transitions that appear when using Android phones are set by the Window Animation Size, Transition Animation Size, and Animation Speed (Scale) settings – some phones are called slightly differently, but you’ll recognize them. These are set to 1x by default.
If you change them to 0.5x, you double the speed of the animations (the lower this multiplier, the faster the transitions will be), and you will make your phone minimally but noticeably faster. This isn’t just a sensory disappointment, by the way, we actually halve the frames spent on animations, so we actually get a faster response from our phone.
Personally, I wouldn’t go into the other settings right now, but if anyone’s curious, I’m sure you can find more articles on the web about which settings does what exactly.
Bitwarden – passwords in one place
In my previous post, I mentioned the Bitwarden browser extension, which allows you to bombproof your passwords and store them in a central, super-encrypted database that you only need to remember one master password to access.
Bitwarden is of course available for Android and can be easily installed from the Play Store.
Once installed, you’ll need to turn on Auto-fill Services in the app’s Settings, and then you’ll also want to set it up so that you can unlock the password vault using biometric authentication for simplicity.
And we’re done.
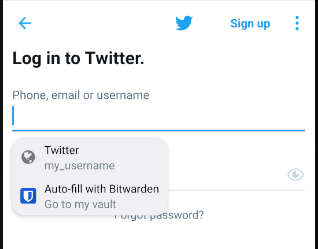
From now on, the Bitwarden helper will appear on the login page of our applications and websites opened in our browsers, and after a successful authentication, it will quickly and easily fill in the username and password we saved previously to log us in.
bxActions – Reconfigure Bixby and volume buttons
Many Samsung Galaxy phones have a dedicated button that triggers Bixby, Samsung’s smart voice assistant.
However, in the world of Google Assistant this is completely unnecessary, and it doesn’t even speak Hungarian, so in most cases it’s just an annoyance when we accidentally press this button and Bixby tries to do something “clever” for us.
With an app called bxActions, you can reconfigure this button and the volume buttons.
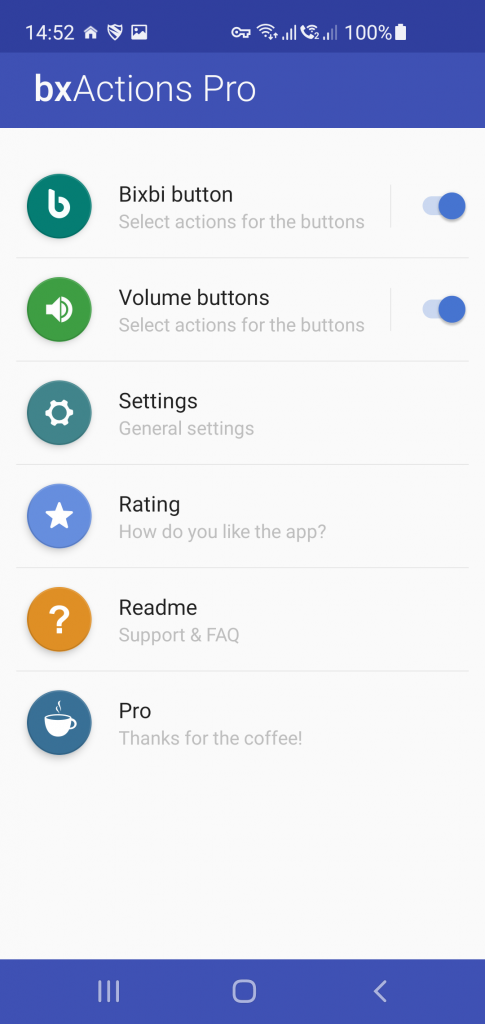
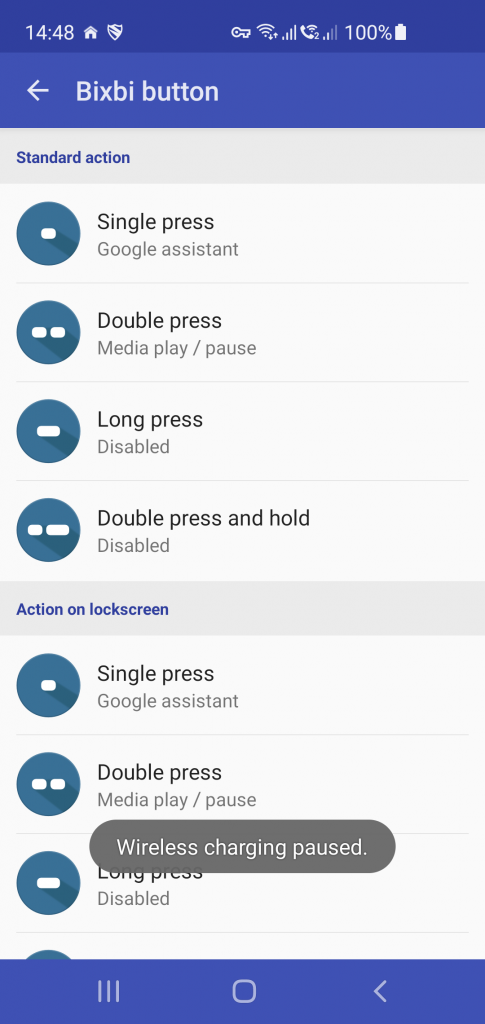
For each button, you can define four different custom settings depending on the button press, plus you can set separate actions when the screen is closed, so that’s eight different things for one button!
Why is this useful?
Well, in my case, pressing the Bixby button once no longer launches the useless Bixby Assistant, but the much more useful Google Assistant, and pressing it twice acts as a play/pause button.
The volume control buttons also work as usual when pressed once, but when pressed twice they jump to the next or previous track while playing music. Of course, this setting is also available with volume control headphones, so you don’t have to fumble around on your phone to change the music while you’re running, for example.
Personalising your Android phone
I’ve been using Nova Launcher since about its release, which completely replaces the built-in Android system launcher, and with it I can, for example, hide the original (and often unfortunately burned-in and therefore unremovable) YouTube app in my app list, and rename YouTube Vanced and set it to the original YouTube icon. From now on, there is no confusion about which one I launch.
So-called “customisation” or personalisation is a broad topic, by the way, and I may write a separate post about it one day, but suffice it to say that Android phones are very customisable.
If you want to get lost in this like Alice down the rabbit hole, I recommend, for example, the Android Authority’s introductory video or Sam Beckman’s Nova Launcher videos as a start.
Closing words
This is a long article as it is, and I could write a lot more on this topic, but I have to draw the line somewhere.
I hope that I have managed to give you all some new information, and pick your curiosity about getting to know your phone a bit better.
My next posts will probably be about some more security techniques and useful websites I have collected over the years.
